
How to make a wooden Yo Yo ,Yoyo or whatever it is. At night, I found a website that explains with clarity and detail about the making of this Yoyo. therefore, I want to share the contents of the website.
without the long way
So, Check this out ...
First Step :
Material List
| Item | Qty. | Description |
| #1 | - | 1/2" - 5/8" (13-16mm) thick hardwood, ie. maple or walnut: you can also use plywood which will be stronger; you only need enough to make two yo-yo discs which are about 2 1/2" (63mm) in diameter. |
| #2 | 1 | 1/4" or 5/16" (6 or 7mm) hardwood dowel depending on the size of your drill bit: if your drill bit is an undersized 1/4" (6mm) bit, then you can use a 1/4" (6mm) dowel (provided that it is not undersized), otherwise you will have to follow our instructions on how to bring down the size of a 5/16" (7mm) dowel. |
| #3 | - | finishing oil  |
| #4 | 1 | yo-yo string |
| #5 | 1 | 1/4" - 20 x 3" bolt (M6 x 75mm) |
| #6 | 1 | 1/4" - 20 (M6) nut |
| #7 | 2 | washers with clearance for 1/4" (M6) bolt |
| #8 | - | wood glue (optional) |
Tool List
| Tool |
| compass |
| bandsaw , jigsaw or scrollsaw |
| square |
| sandpaper of varying grits (preferably from 100 to 400) |
| drill press |
| various clamps see plan for details |
| vise |
| disc sander |
| thickness planer not necessarily required |
| two small wrenches |
Step 2 :
| We will start by preparing the wood. The desired width is between 1/2" to 5/8" (13 - 16mm), we made ours about 9/16" (14mm). If your wood is thicker you will need to plane it to size. You can use a hand plane or a thickness planer until you have reached the desired thickness. If you are using plywood for the yo-yo discs, you can skip this step. |  |
Step 3 :
| Next, mark the circles: you will need two for each yo-yo that you are making. Use a compass to carefully draw the circles and make sure that a clear mark is left in the middle of the circle: you will need this when you are drilling the holes for the axle. We used a diameter of 2 3/8" (6cm) but you can increase or decrease this as desired. Try a very large one and a very small one and see what happens. Note that you can make different test yo-yos without sanding and finishing to determine the best size for your hand. Such a yo-yo can be made in a very short period of time. | 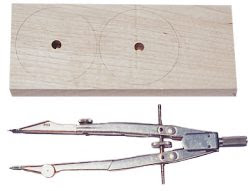 |
| Before cutting the discs, this is a good time to drill the holes because it is easier to hold the workpiece at this stage since it is larger. Make sure that the drill press table is square to the chuck. We used a straight steel shaft and a small square as shown in the picture on the right. A perpendicular hole is critical for proper functioning of the yo-yo so do not attempt to make the holes with a hand drill unless you have a portable drill press fixture. Check for perpendicularity in several planes, not just on side. Make sure that you put a piece of flat scrap wood beneath the wood you are drilling so that you do not get any tearout when the drill bit penetrates through. Drill a through hole precisely where the mark is left from the compass to ensure that it is properly centered. |  |
Step 4 :
Using the bandsaw, scrollsaw or jigsaw, trim the wood near the circle; there is no need to try to get extremely close to the line unless you are confident with your sawing abilities. If you are using a jigsaw, note that the blade can have a tendency to bend and wander when you are cutting radiuses, so make sure that the blade doesn't encroach into the wood that will become the yo-yo.
Step 5 :
This is a good time to check the squareness of the disc sander. The table should be set to a 90 degree angle to the sanding disc. Sand the two yo-yo discs right up to the line, making sure that you do not stay in any given place for more than a moment: doing so will cause your wood to burn. Constantly rotate the wood, removing small amounts of material.
Step 6 :
| Now we are going to perform the radiused edges on the yo-yo discs. If you have a lathe, this is the perfect opportunity to use it. We are going to show an alternative for those woodworkers who do not have access to a lathe. Using a 1/4" (M6) bolt, clamp a yo-yo disk with a nut and large washers. The bolt should snugly fit into the holes that you drilled and therefore should be centered. Put this assembly in the chuck of a drill press but do not overtighten the chuck because doing so will mar the threads and make it impossible to unscrew the nut. If excessive marring does occur and you cannot remove the nut even with a wrench, use a hacksaw to cut away the marred threads. An even better solution is to use a threaded rod instead of a bolt along with an additional nut so that you can remove the yo-yo disc from beneath without having to unchuck the assembly. |   |
| Using sandpaper on the trailing edge (not the edge that is spinning toward you) of the rotating disc, sand away the edges of the wood until they are rounded. You should not resize the circle because you are likely to make it out of round. Use this step just to round the edges. Make one of the yo-yo discs to the desired shape and match the other to it: keep the first one nearby when you are working on the second so you can stop the drill press and compare the profiles. You can complete the sanding of the edges while you have it in the drill press and progress through finer and finer grits of sandpaper. Once you reach 400 grit, the wood will be shiny and very smooth. Avoid providing too much force against the drill press in any direction because drill presses are not designed to withstand excessive forces in any direction except up. Proceed through this step slowly and methodically. |
Step 7 :
Now we can complete the sanding on the faces of the yo-yo discs that were previously blocked by the washers. Start at approx 100 grit sandpaper and proceed to the next finer grit only after you have removed all the sanding scratches created by the previous step. Once you arrive at 400 grit, you will have a beautiful shiny yo-yo.
Step 8 :
Next we need to complete the axle. If your drill bit was undersized (most drill bits are not exactly what they claim to be), they you can use a 1/4" (6mm) hardwood dowel providing that it is not undersized as well. You want the axle to have to be pressed into the holes in the yo-yo discs. If they can be slid in with hand strength then they are definitely too small. The best thing to do is to choose a larger diameter dowel and sand it down to the desired size. We cut a 5/16" (7mm) diameter dowel to about 4" (10cm) long (to make two yo-yo axles). Clamp this dowel into the drill press chuck and using a coarse sandpaper (we used 100 grit), evenly sand the dowel. Resist the temptation of wrapping the sandpaper around the dowel: just place it on one edge as you did in step 6. Stop at the point when you are almost able to slide a yo-yo disc onto the dowel. If you have a vernier, the dowel should be about .01" (.25mm) larger than the hole.
Once you have sanded the dowel to the correct diameter, let's cut it to the proper length. The length should be the width of the two yo-yo discs plus 3/32 of an inch (2.5mm). Stack the two yo-yo discs on a flat surface, and measure both of them together to accomplish this. The 3/32" (2.5mm) is the desired gap between the two discs. You should cut off some of the end of the dowel because it tends to get a little more sanding than the rest of the dowel and thus has a slightly narrower diameter. Mark the desired length and cut it on the bandsaw, slightly oversized. Then sand the ends down on the disc sander to achieve the proper length. Remember not to keep the dowel in contact with the sander for more than a short moment -- doing so will burn the dowel. You can also sand a small chamfer on both ends of the dowel to make it easier to insert the dowel into the holes.
Step 9 :
| Now all the pieces are ready for a finish. You can use a stain and follow with a polyurethane but you shouldn't put any surface coatings on the insides of the yo-yo discs. We used antique oil which is an oil/ varnish blend consisting of mineral spirits, oil, and a spar varnish. Since antique oil soaks in and doesn't leave a coating, you can finish all the pieces entirely. After wiping the oil on with a brush and waiting for about 5 to 10 minutes, we wiped of the excess with a clean rag. We let it dry overnight and repeated this process two more times. For more information regarding finishing, consider Understanding Wood Finishing by Bob Flexner. |  |
| Alternatively you may want to paint the yo-yo. This may be particularly desirable if you are using plywood as opposed to hardwood. Follow the paint manufacturer's directions. Avoid painting the axle, the inside surfaces of the yo-yo and the interior of the holes of the yo-yo discs. |
Last Step :
| The last step is to press the axle into place. You can place the yo-yo string around the axle before you do this to make it a little easier to string up. Align all the pieces in a vise and slowly increase the clamping pressure. The axle should methodically be pressed into the yo-yo discs. Continue until the axle hits the surfaces of the vise -- this should give you the 3/32" (2.5mm) gap that you were looking for. If the gap is too big, you can put a spacer between the yo-yo and the vise and continue tightening the vise until you have achieved the desired gap, but of course, the axle will protrude a little from the disc. If you can twist the yo-yo discs easily with your hands, then the axle is too small. You can try wetting the axle which will cause it to swell and let it dry and try again. After a couple of times with this process, the axle fibers will be resized and you will have to use a new axle, but this won't be too often. |  |
| A tight fitting axle can be press fit into the yo-yo sides without glue. If you refrain from using glue, an errant throw can send one or both halves spinning across the room. If and when you glue the axle into place, make sure that you put a drop of glue inside the hole but toward the outside of the yo-yo discs; press the axle into place as described above. The yo-yo may not function well if any glue squeezes out between the two discs because the dried glue may interfere with the string. |
source : http://www.uniqueprojects.com/

Recomended Post
Loading...
 Youtube Video


0 comments:
Post a Comment