
Intro : Paper Stomp Rockets - Easy and Fun!
I run a free summertime activity program for kids as part of my job in the city where I live. So I've got a lot of fun little projects up my sleeves, and I'm always on the lookout for more. My own kids get to be the test group for all the crafts and activities that I do for work, and every so often I'll get out their favorite things to play with at home. One of the more popular summertime activities in my repertoire is homemade stomp rockets. Stomp rockets are great because they are both creative and physical.
There are many versions of paper stomp rockets and launchers out there. They all work essentially the same way: air is forced through a PVC contraption which launches a lightweight paper rocket up into the air. This particular launcher design is a combination of a handful of ideas I've seen, along with a few of my own additions.
I have a basic rocket design that I drew up that uses a single sheet of paper, which I've included in step 6 as a PDF.
Read on, and then go have some fun!

First Step : Materials
This launcher design produces no waste, and should cost around $10.
For one launcher, you will need:


Stomp Rocket Template.pdf

Source : Link
For one launcher, you will need:
- One 10-foot length of 1/2-inch PVC
- One 1/2" 90-degree elbow (all fittings are of the slip variety)
- One 1/2" four-way fitting
- Two 1/2" end caps
- One 1" coupling
- One 1" by 1/2" bushing
- One 2-liter soda bottle cap
- Lots of 2-liter soda bottles
- PVC cement
- Hot glue
- White glue
- Cotton balls
- Tape
- Sheets of 8 1/2" by 11" paper
- Lots of copies of the attached PDF rocket template

Step 2 : Cut the PVC
From your 10-foot length of PVC, cut the following pieces:
- One 40" piece
- One 18" piece
- One 5" piece
- Two 12" pieces
- Three 11" pieces

Step 3 : Buld basic launcher assembly
The photos should provide enough detail on how to construct the basic launcher assembly. Use PVC cement to put it all together.
The 12-inch pieces are the side supports that make the base. The 18-inch piece is the riser from which the rockets will launch. I used my palm sander to quickly knock off the sharp edge of the launch-end of the 18-inch piece of PVC.
The 1" coupling and the 1" by 1/2" bushing go together to make the bottle end of the launcher.

Step 4 : Make the bottle-end of the launcher
2-liter bottles make great bladders for stomp rocket launchers because they're readily available and they're pretty durable. This set-up is especially nice because it allows you to quickly replace bottles when they've been completely worn out or cracked.
Begin by drilling a hole through a 2-liter bottle cap. This is easiest to do while the cap is screwed onto an old bottle.
I prefer to use hot glue to glue the bottle cap into the opening of the 1" coupling. Hot glue is quick, fills the gap between the bottle cap and coupling nicely, and it's only semi-permanent.
When the bottle cap itself begins to wear out and the threads are stripped, you can just grab it with a pair of pliers and yank it out to replace it with a new one.

Step 5 : Make rocket forming tubes
The three 11-inch pieces of PVC will be used to make three separate rocket forming tubes. These will help you make perfect rockets every time. It's nice to have a few on hand so more than one person can be working on a rocket at the same time.
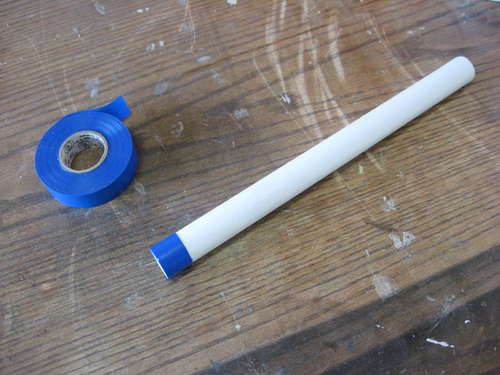
You want the forming tubes to be slightly bigger than the tube that the rockets get launched from. This is accomplished by gluing a sheet of 8 1/2" by 11" paper around each forming tube. I used white glue and glued each sheet directly to the tube, and then to itself after rolling it on tight.
A piece of tape (I used electrical tape) was wrapped around one end of each paper-covered tube. This is to aid in the construction of the rocket, as detailed in the next step.

Step 6 : Make some rockets
Print out and make plenty of copies of the attached PDF rocket template.
There are basic building instructions on the rocket template. Decorate and cut out areas as directed.
Roll the rocket body section onto forming tube, with the bottom of rocket (where the fin placement lines are located) just above the tape at the end of the forming tube. This creates an open space at the top of the tube, where the cotton balls will go.
Tape the body tube together, but NOT to the forming tube. Fold the fins and tape them in place on the fin placement lines. Place two cotton balls into the open area at the top of the paper tube, and cover with a couple of pieces of tape. Remove rocket from forming tube.


Stomp Rocket Template.pdf
Last Step : Launch!
Before you launch your rockets, be sure to explain some safety rules to everyone involved so nobody gets shot in the eye.
After each launch, you will have to refill the bottle with air. I tell the kids to hold the top of the launch tube with their hand and blow through their hand to fill up the bottle. This way germ-passing is somewhat minimized.
I have made a total of six launchers, a couple of which were made with 45-degree-angled risers. These have been especially fun.
Be sure to post a comment and some photos if you make some stomp rockets of your own!

Source : Link

Recomended Post
Loading...
 Youtube Video


1 comments:
This looks like a lot of fun! However, I can't find the promised pdf template for the rocket. Did I miss it somewhere?
Sorry for two posts. Figuring this out :)
Post a Comment