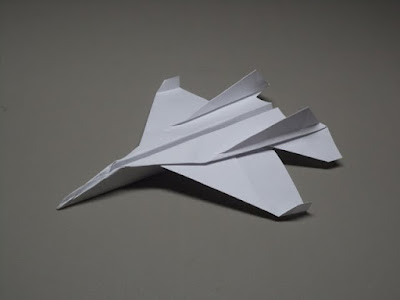
Intro : How to make F-15 Paper Airplane by Joe_Tutorials
Step 1: Setup Folding
I'm using standard (American) printer paper, which measures 8.5 by 11 inches. First perform a "hotdog style" fold, then unfold. Next, fold the top edge down until it is about half an inch or so from the bottom edge and unfold. Now fold in the diagonals as shown. The bottom two edges should be parallel and the crease should pass through the center point. Do this in both directions, then unfold.
Step 2: Form the Base
Now we will create a modified water bomb base. Take the horizontal
crease and mountain fold it strongly. Then press down on the center
point gently until it pops into place. From here, grab the two opposite
ends of the mountain fold and slowly draw them inwards and down. Then
press the whole thing flat and finalize the creases.
Step 3: Form the Right Tail
First, move both wings off to the side just to get them out of the way.
Then fold in the right edge to the center crease. Rotate the paper 90
degrees to the left, then fold the tail edge up to the top corner as
shown.
Step 4: Form the Left Tail
Move both wings up to the top, then rotate the entire paper 180 degrees. Repeat the previous step on this side.
Step 5: Strengthen the Wings
Before we shape the wings, this step will make them stronger. Open the
wings up so they are on opposite sides, then rotate 90 degrees to the
left. Fold in the edges on both sides as shown. The folds should be
very narrow but strongly creased.
Step 6: Shape the Right Wing
Move both wings over to the left and rotate the plane 90 degrees to the
left. Next fold the top wing up to the point on the tail (where I'm
pointing to in the third picture) so that the inside edge of the wing
also forms a perfect 90 angle with the edge of the tail. At the base of
the wing (5th picture) there should be a small flap. Fold it upwards
and crease strongly.
Step 7: Finish the Right Tail
Move both of the wings down and fold the edge of the tail inwards as shown. Then fold the wings back up and rotate the plane 180 degrees.
Step 8: Shape the Left Side
Repeat the steps on step 6: fold up the wing as described and then fold
up the bottom flap. Then repeat step 7 to finish the tail. Flatten the
plane out and rotate it 90 to the left.
Step 9: Shaping the Fuselage: Part 1
Flip the plane over and you will notice two small tabs on either side of
the nose. They should be folded inwards as far as possible. Then
valley fold along the center crease and position the plane as shown in
the last picture.
Step 10: Shaping the Fuselage: Part 2
Around 3/4ths of an inch of the way up from the bottom of the plane,
Grab the top layer wing and tail and fold down parallel to the base.
Crease this very strongly. Next, flip the plane over and repeat, being
sure to keep both folds in alignment.
Step 11: Shaping the Plane
On this step, lift the wings up so that stay just above 90 degrees.
Then use your fingernail to lift one of the top flaps up (the ones that
cover the tails) and crease it to make them perfectly vertical.
Step 12: Fold up the Winglets
Take a small portion (about 1/4 inch inwards from the edge of the wing)
of the wing tip and fold it up to vertical. Do this on both wings,
keeping symmetry in mind.
Step 13: The Finishing Touch
This last step may be a little tricky depending on how well you folded
the plane. Those two tabs that were folded inwards on step 9 each have
small pockets on them. You should be able to insert one of the tabs
into the pocket on the other tab and have it stay. This will hold the
plane together very well in flight, but it should be able fly without
this step.
Step 14: Finished!
Now you are completely done! Have fun flying this awesome looking plane
around. I hope you enjoyed this tutorial. If this seemed easy to you,
you should definitely check out my tutorial on the Origami F-16 (or any
of my other tutorials). For even more origami, click here to check out my Youtube channel and if you like it, subscribe to show your support! Keep on folding!
Source : Link

Recomended Post
Loading...

 Youtube Video

0 comments:
Post a Comment